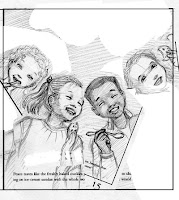
With my book, Sensing Peace, we had decided that one of the interior pages would double as the cover. The Editor liked the picture of all the children eating ice cream and cookies, but using it the way it was designed would not allow space for the title. Things had to be moved around. This is the time I am so grateful for computers! The image was already scanned in, so it was just a matter of cutting, pasting, and rotating. And for ease in editing, here's a fun little trick I learned from my friend, Maryn, a Photoshop guru. If you want to lift your drawing from the paper and turn it into floating lines with a transparent background, follow these steps (for Mac users):
1. Be sure your image is in RGB or CMYK mode. You can check by selecting Image>Mode, and make sure there is a checkmark next to "RGB Color" or "CMYK Color."
2. Go to your Channels palette (found under "Window" if you don't already see it on your desktop). Hold down your command key and click on the top channel in the list, which will be labeled either RGB or CMYK. That will select all your white space.
3. Hold Command, Shift and hit "I" to inverse the selection. Now your lines are selected.
4. Create a new layer.
5. Make sure your brush color is black, and with the fill tool, click on your image. You have now created a layer of just your lines. You can clear the image on the background to have a clean white "paper" layer behind, or delete the background layer entirely to make it transparent.
 I find having just the lines is easier when I'm repositioning elements because the white of the "paper" doesn't overlap and block out areas around the piece I'm moving.
With a little editing in Photoshop, I got my characters all moved into an arc across the bottom of the page, leaving room for the page text or the title at the top so it could be used for both. Then, just to be sure I knew where I was going, I did another outline drawing of the page using an art tracer. I could have just done this in Photoshop, but I wanted the drawing quality to be consistent with my other comps. While doing this final drawing, I also flipped two of the characters so the girls and boys weren't all on the same side, and filled in details which had previously been outside the frame. I scanned that image in and sent it to the Editor for approval, along with a few other changes they had requested. Once everything was approved, it was on to the painting! Huzzah!


No comments:
Post a Comment