
Friday, February 6, 2015
Website Makeover!
Every once in a while, in what can only be called a fit of creative insanity, I throw all my daily responsibilities aside and give my website a makeover. This one was long overdue, and I'm very happy with the new look! I've also added some of my more recent work. Hope you enjoy!

Monday, February 25, 2013
Gingerbread House

 The grocery store I shop at has an annual gingerbread house contest, prize being $500. I had never made a gingerbread house before, but last year I thought to myself, "I'm an artist. How hard can it be?" So I designed and built one for the Christmas of 2011. It was loads of fun. I wanted to depict a scene that embodies the best of the Christmas spirit: that of giving secret service. It built a skeewampus log cabin using chocolate licorice for the logs walls. There was a little family on the doorstep, having just discovered the basket left by two others peeking around the corner. The chimney has a bird sitting on top, wings wrapped around him to show there's no fire in the fireplace. I had such fun making it.

But I got to take my little cabin home and enjoy it with my family. When Christmas was well over, a dear friend told me I should keep it instead of throwing it away. It sat on my counter for a few months before it started to fall apart, and I knew there would be no safe place to store it, nor did I want to bother piecing it back together.

Friday, May 18, 2012
On Break

This is the only creative project I will be working on for the next several months! This little nubbin is taking all my creative juices at the moment, so I'm putting this blog on hold until further notice. I may or may not continue to post occasionally on my other blog, The Only Thing Constant, which focuses a little more on life insights and musings (as experiences like this often cause lots of musings) but this blog will go untouched until I can resume some semblance of a career to talk about.
Cheers!
Sunday, April 1, 2012
In the Off Season

Saturday, March 31, 2012
Editing
Invariably, there will be some changes requested by the Art Director or Editor. Do not take offense at these. You're still awesome! Trust that the AD or Editor know their market, and respect their expertise with humility and grace.
 With my book, Sensing Peace, we had decided that one of the interior pages would double as the cover. The Editor liked the picture of all the children eating ice cream and cookies, but using it the way it was designed would not allow space for the title. Things had to be moved around. This is the time I am so grateful for computers! The image was already scanned in, so it was just a matter of cutting, pasting, and rotating. And for ease in editing, here's a fun little trick I learned from my friend, Maryn, a Photoshop guru. If you want to lift your drawing from the paper and turn it into floating lines with a transparent background, follow these steps (for Mac users):
1. Be sure your image is in RGB or CMYK mode. You can check by selecting Image>Mode, and make sure there is a checkmark next to "RGB Color" or "CMYK Color."
2. Go to your Channels palette (found under "Window" if you don't already see it on your desktop). Hold down your command key and click on the top channel in the list, which will be labeled either RGB or CMYK. That will select all your white space.
3. Hold Command, Shift and hit "I" to inverse the selection. Now your lines are selected.
4. Create a new layer.
5. Make sure your brush color is black, and with the fill tool, click on your image. You have now created a layer of just your lines. You can clear the image on the background to have a clean white "paper" layer behind, or delete the background layer entirely to make it transparent.
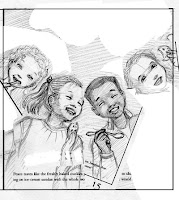 I find having just the lines is easier when I'm repositioning elements because the white of the "paper" doesn't overlap and block out areas around the piece I'm moving.
With a little editing in Photoshop, I got my characters all moved into an arc across the bottom of the page, leaving room for the page text or the title at the top so it could be used for both. Then, just to be sure I knew where I was going, I did another outline drawing of the page using an art tracer. I could have just done this in Photoshop, but I wanted the drawing quality to be consistent with my other comps. While doing this final drawing, I also flipped two of the characters so the girls and boys weren't all on the same side, and filled in details which had previously been outside the frame. I scanned that image in and sent it to the Editor for approval, along with a few other changes they had requested. Once everything was approved, it was on to the painting! Huzzah!


1. Be sure your image is in RGB or CMYK mode. You can check by selecting Image>Mode, and make sure there is a checkmark next to "RGB Color" or "CMYK Color."
2. Go to your Channels palette (found under "Window" if you don't already see it on your desktop). Hold down your command key and click on the top channel in the list, which will be labeled either RGB or CMYK. That will select all your white space.
3. Hold Command, Shift and hit "I" to inverse the selection. Now your lines are selected.
4. Create a new layer.
5. Make sure your brush color is black, and with the fill tool, click on your image. You have now created a layer of just your lines. You can clear the image on the background to have a clean white "paper" layer behind, or delete the background layer entirely to make it transparent.
 I find having just the lines is easier when I'm repositioning elements because the white of the "paper" doesn't overlap and block out areas around the piece I'm moving.
With a little editing in Photoshop, I got my characters all moved into an arc across the bottom of the page, leaving room for the page text or the title at the top so it could be used for both. Then, just to be sure I knew where I was going, I did another outline drawing of the page using an art tracer. I could have just done this in Photoshop, but I wanted the drawing quality to be consistent with my other comps. While doing this final drawing, I also flipped two of the characters so the girls and boys weren't all on the same side, and filled in details which had previously been outside the frame. I scanned that image in and sent it to the Editor for approval, along with a few other changes they had requested. Once everything was approved, it was on to the painting! Huzzah!

Thursday, March 29, 2012
Comps
My next step in illustrating a children's book is drawing comps. Since I have my handy storyboard template laid out in InDesign, I like to grab each double page spread and upscale until the pages are about 25% of the finish size. That usually gives me about 2 spreads per page. You may recall from my last post that I have already placed my text, so that will upscale as well. I can tweak as necessary, based on my design decisions and the font type and size information I have obtained from the publisher.
 Next I print out these pages and make more careful drawings based on the thumbnails I already did. Now I worry more about detail and carry over the composition and value decisions I had already made. These are what the client will see, so I have to solve a lot of things. When I'm just sketching for myself, I may do a scribble for a hand or a face, but now I need to really show the way it will look in the finish.
 This is also the point at which I need to get and use any reference photography I need. I work a lot from my head, but there are things I'm not familiar enough with, or poses that are tricky enough that I have got to get some good reference. The internet is a wonderful resource these days! It used to be that an artist would fill a filing cabinet with pages torn from magazines just to have images on hand. Now all we have to do is google what we want and have millions of images to choose from. Just be sure you don't plagiarize. Use the images as guidelines, never copy them outright. And to play it completely safe, take your own pictures. (My own kids and husband make great models!) If you aren't using your own family, always get permission (especially from parents of young children) and use a model release.
Once all the images are rendered, I scan them in, clean them up and send them along to the editor for feedback.

 This is also the point at which I need to get and use any reference photography I need. I work a lot from my head, but there are things I'm not familiar enough with, or poses that are tricky enough that I have got to get some good reference. The internet is a wonderful resource these days! It used to be that an artist would fill a filing cabinet with pages torn from magazines just to have images on hand. Now all we have to do is google what we want and have millions of images to choose from. Just be sure you don't plagiarize. Use the images as guidelines, never copy them outright. And to play it completely safe, take your own pictures. (My own kids and husband make great models!) If you aren't using your own family, always get permission (especially from parents of young children) and use a model release.
Once all the images are rendered, I scan them in, clean them up and send them along to the editor for feedback.
Monday, March 26, 2012
Storyboards

Children's books are generally 32 pages long. That includes 1-6 pages of end pages and front matter such as copyright info, dedications, and one or two title pages, so in the end, there are usually only 26 pages for actual story.
When I get the text for a book, the first thing I do is mark the page breaks and jot down some image ideas. Then I pull out the storyboard template I created in InDesign and adjust the box dimensions to fit that of the finished book. Here's a basic pdf version you can use:

I also like to figure out where the text is going to go on each page, so I will cut and paste it right into my thumbnails like this:

It's too tiny to read at this point, but when I do my larger comps, all I have to do is scale the image up and the text is already in place. I mark off the end pages and front matter, so this usually puts us starting the story on page 6. At this stage of drawing, it is best to work very small and focus on composition rather than detail. I also like to decide at this point where I will have double page spreads, full bleeds, borders, or vignettes. I try to keep a variety of angles going on to keep things interesting. In the end, I have a nice idea of how the book will flow.
Here's an example of the storyboards I did for the book, "Sensing Peace."

Some of the images underwent major changes before it was published, but in general we stuck to this plan.
Subscribe to:
Posts (Atom)